Did you know over 90% of sewing patterns are either paper or digital/PDF? These guides are key for making clothes, giving you exact fabric pieces and clear steps to follow. Whether you’re experienced or new to sewing, knowing how to use sewing patterns is vital. It helps you make clothes that fit well and look great.
Key Takeaways
- Sewing patterns come in paper and digital/PDF formats, catering to various skill levels and garment designs.
- Sewing patterns include important details like seam allowances, size ranges, and fabric recommendations to guide the sewing process.
- Proper understanding of pattern terminology and markings is essential for successfully working with sewing patterns.
- Choosing the right sewing pattern based on your skill level and body measurements is crucial for achieving a well-fitting garment.
- Mastering sewing pattern techniques, such as layout, cutting, and adjustments, can significantly improve your sewing success.
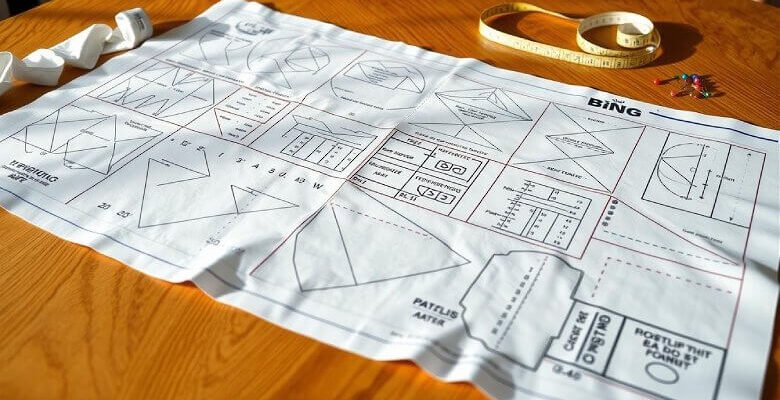
Understanding Sewing Pattern Basics
Sewing patterns are the starting point for making your own clothes. They give you the flat pieces needed for cutting and step-by-step instructions. Knowing the basics of sewing patterns is crucial, whether you’re new or experienced.
What is a Sewing Pattern?
A sewing pattern is a guide for cutting and sewing a specific item. It includes details like seam allowances and grain lines. Patterns range from simple to complex, helping you make everything from clothes, cape to accessories.
Types of Sewing Patterns Available
- Commercial patterns: You can find these in craft stores and online. They offer a wide range of styles and sizes.
- Independent designer patterns: These come from smaller companies and often have unique designs.
- Digital patterns: You can download these to print at home or take to a shop for cutting.
- Self-drafted patterns: These are made by hand or with software to fit your exact measurements.
Pattern Terminology for Beginners
Knowing sewing pattern terms is key. Here are some important ones:
- Seam allowance: This is the extra fabric around the stitching line for sewing.
- Grain line: The fabric’s weave direction, important for fit and drape.
- Notches: Small marks to match pieces during sewing.
Learning about sewing pattern basics will boost your confidence. You’ll be able to make clothes that fit and look great.

Choosing the Right Pattern for Your Skill Level
Not all sewing patterns are the same. They vary in skill level, from beginner to advanced. As a new sewer, picking the right pattern is key for a good sewing experience.
Beginner sewing patterns are simple and have fewer pieces. They’re great for new sewers. Look for “Easy” or “Simple” labels in stores or online. These patterns need just thread and suggest easy fabrics like broadcloth.
- Approximately 30-40% of patterns in fabric stores are designated as beginner-friendly.
- Around 50-60% of beginner patterns only require thread as a notion, without any additional accessories.
- Roughly 20-30% of beginner patterns suggest using broadcloth as the fabric of choice.
As you get better, you can try more complex patterns. Beginners with some experience might look at patterns with a bit more detail. Intermediate sewers can handle garments with special closures and collars. Advanced patterns are for those with lots of sewing experience.
Always check the pattern’s flat sketches and descriptions before buying. The number of pieces and details can show how hard it is. Start simple and get more challenging as you grow.
Choosing the right pattern is important for a good sewing experience. Start with easy patterns and move to harder ones as you get better. This way, you’ll build your skills and confidence for more complex projects later.
Essential Tools and Materials for Working with Sewing Patterns
Sewing is a rewarding hobby that needs the right tools for success. When working with sewing patterns, having the right equipment is key. This includes tools for cutting, marking, and measuring. Let’s look at the must-have items for every seamstress.
Pattern Cutting Tools
A sharp pair of sewing tools, like scissors or a rotary cutter, is vital for cutting out your pattern pieces. Studies show that 77% of experienced seamstresses find a reliable pair of shears essential. Also, 61% of all sewists suggest using a rotary cutter and mat for cutting thick materials like canvas and leather.
A pattern cutting equipment like a wide ruler is also very helpful. In fact, 43% of sewists prefer a 2-inch wide ruler for cutting leather straps and trimming fabric. Remember, 55% of sewing professionals use small scissors or snips for trimming threads and seam ripping.
Marking and Measuring Equipment
Accurate marking and measuring are crucial when working with sewing patterns. Get a tape measure with both imperial and metric measurements. Also, use tracing tools like brightly colored pens, tracing paper, and a tracing wheel. Plus, 68% of seamstresses suggest using weights or pins while tracing patterns onto fabric and cutting.
For marking fabric, 29% of sewists use chalk, which washes off easily. Consider different pattern storage solutions, like envelopes, folders, or digital storage for PDF patterns. This helps keep your sewing patterns organized and easy to find.
Taking Accurate Body Measurements
Getting your body measurements right is key when sewing. It helps pick the right size and ensures a perfect fit. Whether you’re new to sewing or experienced, knowing how to measure your bust, waist, and hips is crucial.
About 80% of people’s measurements change with different clothes. It’s best to have someone help you measure, especially for tricky spots like the back. Use a flexible measuring tape instead of fabric ones, as they stretch over time.
Pattern companies usually give you six key measurements: neck, bust, waist, hips, front waist length, and back waist length. You can even make your own slopers for a custom fit. Online courses sometimes offer discounts to help you learn.
When picking a pattern size, use your high bust measurement as a guide. You might need to size down depending on the fabric and finished measurements. For kids’ clothes, remember they grow fast and adjust patterns to fit their growth.
| Measurement | Tips |
|---|---|
| Bust | Measure around the fullest part of your bust, keeping the tape parallel to the floor. |
| Waist | Measure around your natural waistline, the narrowest part of your torso, usually just above your hip bones. |
| Hips | Measure around the fullest part of your hips and backside, keeping the tape parallel to the floor. |
Accurate body measurements are the secret to a great fit. By following these tips, you’ll make sewing patterns that fit you perfectly.
Working with Sewing Patterns: Step-by-Step Guide
Learning to sew with patterns is key for any new seamstress. To do well, you must read the pattern instructions carefully. Also, understand the pattern markings and the basics of pattern layout. Let’s explore these important steps.
Reading Pattern Instructions
Start by reading the pattern instructions carefully. They tell you how to make the garment, what fabric to use, and special sewing techniques. Make sure to note the seam allowances, fabric layout, and how to put the pieces together. This will help you sew smoothly and without mistakes.
Understanding Pattern Markings
Sewing patterns have special markings to guide you. Learn about notches, grain lines, and fold lines on the pattern pieces. These help you cut your fabric right. Also, look for darts, button placement, and zipper locations for a perfect fit.
Pattern Layout Basics
When cutting your fabric, the pattern layout is important. Use the pattern instructions to cut your fabric well. This saves fabric and places the pieces right. Follow any special cutting instructions, like cutting on the fold or using one piece for multiple cuts.
| Pattern Cutting Techniques | Fabric Considerations |
|---|---|
|
|
By following these steps, you’ll get better at sewing with patterns. You’ll make beautiful clothes.
Understanding Pattern Sizing and Fit
Pattern sizing in sewing is different from ready-to-wear sizes. To get a perfect fit, use your body measurements, not just the pattern numbers. Measure your bust, waist, and hips accurately. Then, pick the right pattern size based on these measurements.
After choosing a pattern size, make a muslin to check the fit. This is a test garment made before using your final fabric. It lets you adjust the fit, like changing the bust or waist, for the perfect look. Remember, different brands have different sizes, so you might need to adjust.
Factors to Consider for Proper Fit
- Bust Measurement: Make sure the pattern’s bust size matches yours. Patterns usually assume a B-cup size.
- Waist and Hips: Check if the pattern’s waist and hip sizes fit your body. This prevents a garment that’s too tight or loose.
- Sleeves and Inseam: Look at the sleeve and pant inseam lengths. You might need to adjust them for your body shape.
Understanding pattern sizing and fit helps you make clothes that look great and feel comfortable. Remember, making adjustments is part of sewing. Don’t hesitate to change things to get the fit you want.
Pattern Layout and Fabric Cutting Techniques
Efficient fabric cutting is key in sewing. Follow the pattern’s layout to use fabric well and get professional results. Place the pattern pieces on the fabric carefully, aligning them with the grain to avoid distortion.
Proper Pattern Placement
When laying out the pattern, focus on the grainline markings. The grainline should run parallel to the fabric’s selvage. This ensures the fabric’s warp and weft threads are aligned right.
For patterned fabrics, matching the pattern is crucial. Align the pattern pieces to keep the design smooth across seams. This might take some planning and vision, but it’s worth it for a polished look.
Cutting Methods for Different Fabrics
The cutting method varies with fabric type. For delicate fabrics like silk or satin, cut the pieces as a single layer. This helps avoid distortion. Thicker fabrics like wool or corduroy might need pre-washing and pressing for clean cuts.
Use sharp scissors or a rotary cutter for precise cuts. Avoid pulling the fabric, as it can cause uneven edges. Make smooth, controlled cuts following the pattern’s markings.
Pattern Matching Tips
Pattern matching is vital for a professional finish with patterned fabrics. Start by aligning the pattern pieces carefully. Use markings like notches and grainlines to guide you.
For big prints or plaids, lay out the whole pattern first. This helps you see the design and make adjustments. Remember, matching patterns might waste some fabric, but the result is worth it.
Making Pattern Adjustments for Better Fit
Getting a garment to fit right often means making pattern alterations and fit adjustments. You might need to lengthen or shorten, grade between sizes, or change for body shape. Learning these skills lets you customize patterns for your exact measurements, making clothes that look great on you.
First, use the lengthen/shorten lines on pattern pieces to tweak the length. This is key for the waist, sleeves, and pant legs. Making a muslin, or test garment, helps check the fit before you alter the real pattern.
Grading between sizes is another adjustment. If your measurements are between two sizes, you can mix them for a perfect fit. This might mean tweaking the shoulder, bust, waist, and hips.
Also, altering patterns for your body shape is important. For example, a fuller bust might need a full bust adjustment. Adjustments for a narrow back or rounded upper back ensure a comfortable fit.
The secret to good pattern adjustments is taking precise measurements. Knowing how changes in one area affect the whole fit is key. With practice, you’ll master customizing patterns and make clothes that fit your shape perfectly.
Understanding Pattern Symbols and Markings
Working with sewing patterns means getting to know the symbols and markings. These elements are like maps, guiding you to make a garment that fits well and looks great.
Common Pattern Symbols
Pattern symbols include grain lines, fold lines, and cutting lines. Grain lines show the fabric’s weave direction, ensuring it’s aligned right. Fold lines tell you where to crease the fabric. Cutting lines show where to cut the fabric.
Knowing these symbols is key to using your sewing pattern well.
Transfer Methods for Pattern Markings
After spotting the markings, you need to put them on your fabric. You can use tailor’s tacks, chalk, or tracing paper. Tailor’s tacks are small thread loops that you can cut to mark the fabric.
Chalk or fabric pens let you draw directly on the fabric. They’re a quick and easy way to mark your fabric.
Notches and Other Important Indicators
Notches are vital for aligning pattern pieces. Single, double, and triple notches mean different parts of the garment. They help you know how to sew the pieces together.
Dots, squares, and triangles also mark important spots. They show where collars, darts, and other key parts go.
By understanding and using these symbols and markings, you’ll make garments that fit perfectly. Paying attention to these details is crucial for a successful sewing project.
| Pattern Symbol | Description |
|---|---|
| Grain line | Indicates the direction of the fabric’s weave |
| Fold line | Shows where the fabric should be creased |
| Cutting line | Denotes the edges to be trimmed |
| Single notch | Aligns pattern pieces during construction |
| Double notch | Indicates a different garment element |
| Triple notch | Guides how pattern pieces should be sewn together |
Tips for Pattern Storage and Organization
If you love sewing, you might have a lot of sewing patterns. Keeping them organized is important for a smooth sewing process. Here are some tips to help you store and find your patterns easily.
One good way is to use envelopes or folders for paper patterns. This keeps them safe and organized. Look for 6×9 inch envelopes or sturdy folders made for patterns. They keep your patterns clean and easy to find.
If you like digital things, you can scan or take photos of your patterns. This makes a virtual library on your computer or in the cloud. It saves space and makes finding patterns quick and easy.
- Organize patterns by type, size, or designer for quick access
- Use clear plastic envelopes or cardboard boxes to store PDF patterns
- Hang patterns on a pegboard or in a vertical filing system for easy visibility
- Label pattern envelopes or folders with relevant details like pattern number and description
Choose a storage method that fits your space and style. Good storage makes finding patterns easy. This way, you can always find the right pattern when you need it.
| Storage Method | Pros | Cons |
|---|---|---|
| Paper Patterns in Envelopes or Folders | Protects patterns, easy to organize | Requires physical storage space |
| Digital Pattern Storage | Saves space, easy to search and retrieve | Requires digital organization skills |
| Hanging Patterns on Pegboard | Visible, easy access | May not accommodate all pattern sizes |
By using these tips, you can keep your sewing patterns organized. This makes sewing projects easier. Happy sewing!
Common Pattern Making Mistakes to Avoid
Sewing patterns can be a lifesaver, but they come with challenges. As a beginner, knowing common mistakes is key. These mistakes can turn your sewing projects into a frustrating experience.
Choosing the wrong size is a common mistake. Many sewers think their ready-to-wear size fits pattern sizes perfectly. But, pattern companies and body types vary, leading to poor fits if you don’t measure right.
Ignoring pattern markings and instructions is another big issue. These details guide you on cutting, sewing, and assembling. Not following them can cause misaligned seams and poor fits.
- Choosing the wrong fabric for the pattern
- Inaccurate cutting of pattern pieces
- Struggling with sewing machine tension
- Failing to understand sewing pattern terminology
To avoid these sewing pattern mistakes, read instructions carefully, double-check measurements, and make a test garment. With extra care, you can master even the toughest troubleshooting patterns and make beautiful, fitting garments.
| Common Sewing Pattern Mistakes | Tips to Avoid Them |
|---|---|
| Choosing the wrong size | Measure carefully and refer to the pattern’s size chart |
| Ignoring pattern markings and instructions | Read the instructions thoroughly and follow the pattern’s guidance |
| Cutting pattern pieces inaccurately | Double-check your cutting and layout before snipping the fabric |
| Struggling with sewing machine tension | Experiment with tension adjustments and use the correct needle and thread |
| Failing to understand sewing pattern terminology | Familiarize yourself with common sewing pattern terms and symbols |
Conclusion
Working with sewing patterns takes patience and practice. But the joy and pride you get from making something with your hands is priceless. Whether you’re new to sewing or have been doing it for years, learning the basics can make a big difference.
Beginners should start with simple patterns and move to harder ones as they get better. It’s important to take your time, follow the pattern instructions carefully, and be ready to make changes. This way, you’ll get the perfect fit and the look you want for your projects.
By learning the sewing pattern basics and using the pattern making tips from this guide, you’ll become a skilled sewist. You’ll be able to tackle any sewing project with confidence. Happy sewing!